Showing posts with label Paint. Show all posts

Monday, July 7, 2025

Winter is coming...

 ...of course living in South Carolina in July, that may be more wishful thinking than anything.

Betcha that armor gets cold!

This yeoman is the latest test paint job for Trench Crusade, and has been rather well received by the TC players on the FLGS' discord. I ordered some new heads with different helmets to look more inline with the New Antioch faction than my first test model did (which was just one of my PHIGs in darker colors). 

Given the grimmer-darker than 40k vibe of the game, a lot of folks' color schemes seem to match that sentiment. As such,I wanted to try something different, brightening things up in an Ostfront sort of way. 

Heartwarming I know...

It seriously looks like the caked on mud is still in the process of drying. The darker patches are Vallejo's Dark Mud, painted over the AK Dry Ground diorama paint.

I'm also pleased with the new AK diorama paints that I recently bought in Tennessee. They not only make the basing look more realistic in the mud and snow combination of no-man's-land, but also the mud coating this guy's right leg armor. I intended it to look as though he just recently had taken a knee to steady his aim or else provide a smaller static target. 

The haggard backpack markings identify this yeoman as belonging to the 18th squad of New Antioch's Torchbearer Battalion. 

I've settled on this color scheme and have primed 4 more guys in white, including my warband's Lieutenant. I've also ordered some Heavy Mechanized infantry troopers to bring some serious punch to my warband. So be on the lookout for those sometime in the near future.


Thursday, July 3, 2025

8th Army Universal Carrier

 o/

'Drive me closer, so I can shoot them with my Webly!'

In addition to being a command vehicle, this is also an ammo carrier for the armored platoon.

At the used book store in TN.

We recently spent a few days in Tennessee and while at the Airbnb, I did a bit of painting in the evenings. I lost the decal sheet for this model, so there are no markings. That said, I thought it came out well for having both a limited number of paints and less than ideal lighting. 

Still lacking a good hobby supply store in SC, I stocked up on some new goodies when visiting my old FLGS: HobbytownUSA.


Monday, December 2, 2024

Early Christmas presents!

 o/

I love that woman!

We stopped into Hobbytown USA (one of my old FLGS') while we were in Tennessee, I was looking to restock up on some hobbying supplies. While I can find minis aplenty down here in South Carolina, I have yet to find a good local supplier of the Gamers Grass tufts, laser cut plants, and Vallejo's primers. GW paints and a few other brands, no problem, but the aforementioned items I have been having to order off of Amazon, eBay and Gamecraft minis

Coupon in hand I was looking at what to get without going overboard when my beautiful wife said that she hadn't gotten me much for Christmas yet as she didn't know what to buy. So her suggestion: stock up! As you can see I was happy do to so! 

Friday, July 28, 2023

Here be Dragons... (v.2)

 o/

Scary aren't they? No really, they are. Seriously!
They even have rules that say they are...

I'm sorry Zzzzz I tried, I really did. It just didn't work out. For those who aren't aware, Zzzzz is the one who named my Incandescent Coyotes chapter after seeing their initial paint jobs. As such he was rather fond of them and was somewhat appalled to have found out that they went the way of eBay. 

These were more or less no frills speed paints.
Simple & easy which bodes well for their future.

The Coyotes were all Firstborn marines, which outside of 30k are unsurprisingly going the way of the Dodo. Their color scheme was difficult and laborious to paint. Indeed the Gryph-Hound Orange contrast paint was the real culprit. Unlike the other contrast paints in my inventory with which I've had considerable success, I just could never get the Coyotes' orange right. 

I need to get some of the alien tufts which are red, blue &
hot pink as opposed to these which are just dead.

So, on a whim...I thought I'd try and resurrect the Coyotes with a Primaris reboot, reversing their color scheme of orange with black trim to a more manageable black with orange trim. All was going well until...I started fighting with the damned orange contrast on the pauldrons. Multiple coats to smooth it's appearance out, difficulty with the Coyote emblem on said pauldron again as well, and then...

I said: Fuck it. 

All black it is. Sorry Zzzzz, the Coyotes are lost to history. Looking at my decal sheets I found a considerable number of still unused Silver Drake decals and I instead revisited a chapter that I toyed with years ago: the Black Dragons. Rather than retell their appeal, you can just reread it in this old post here

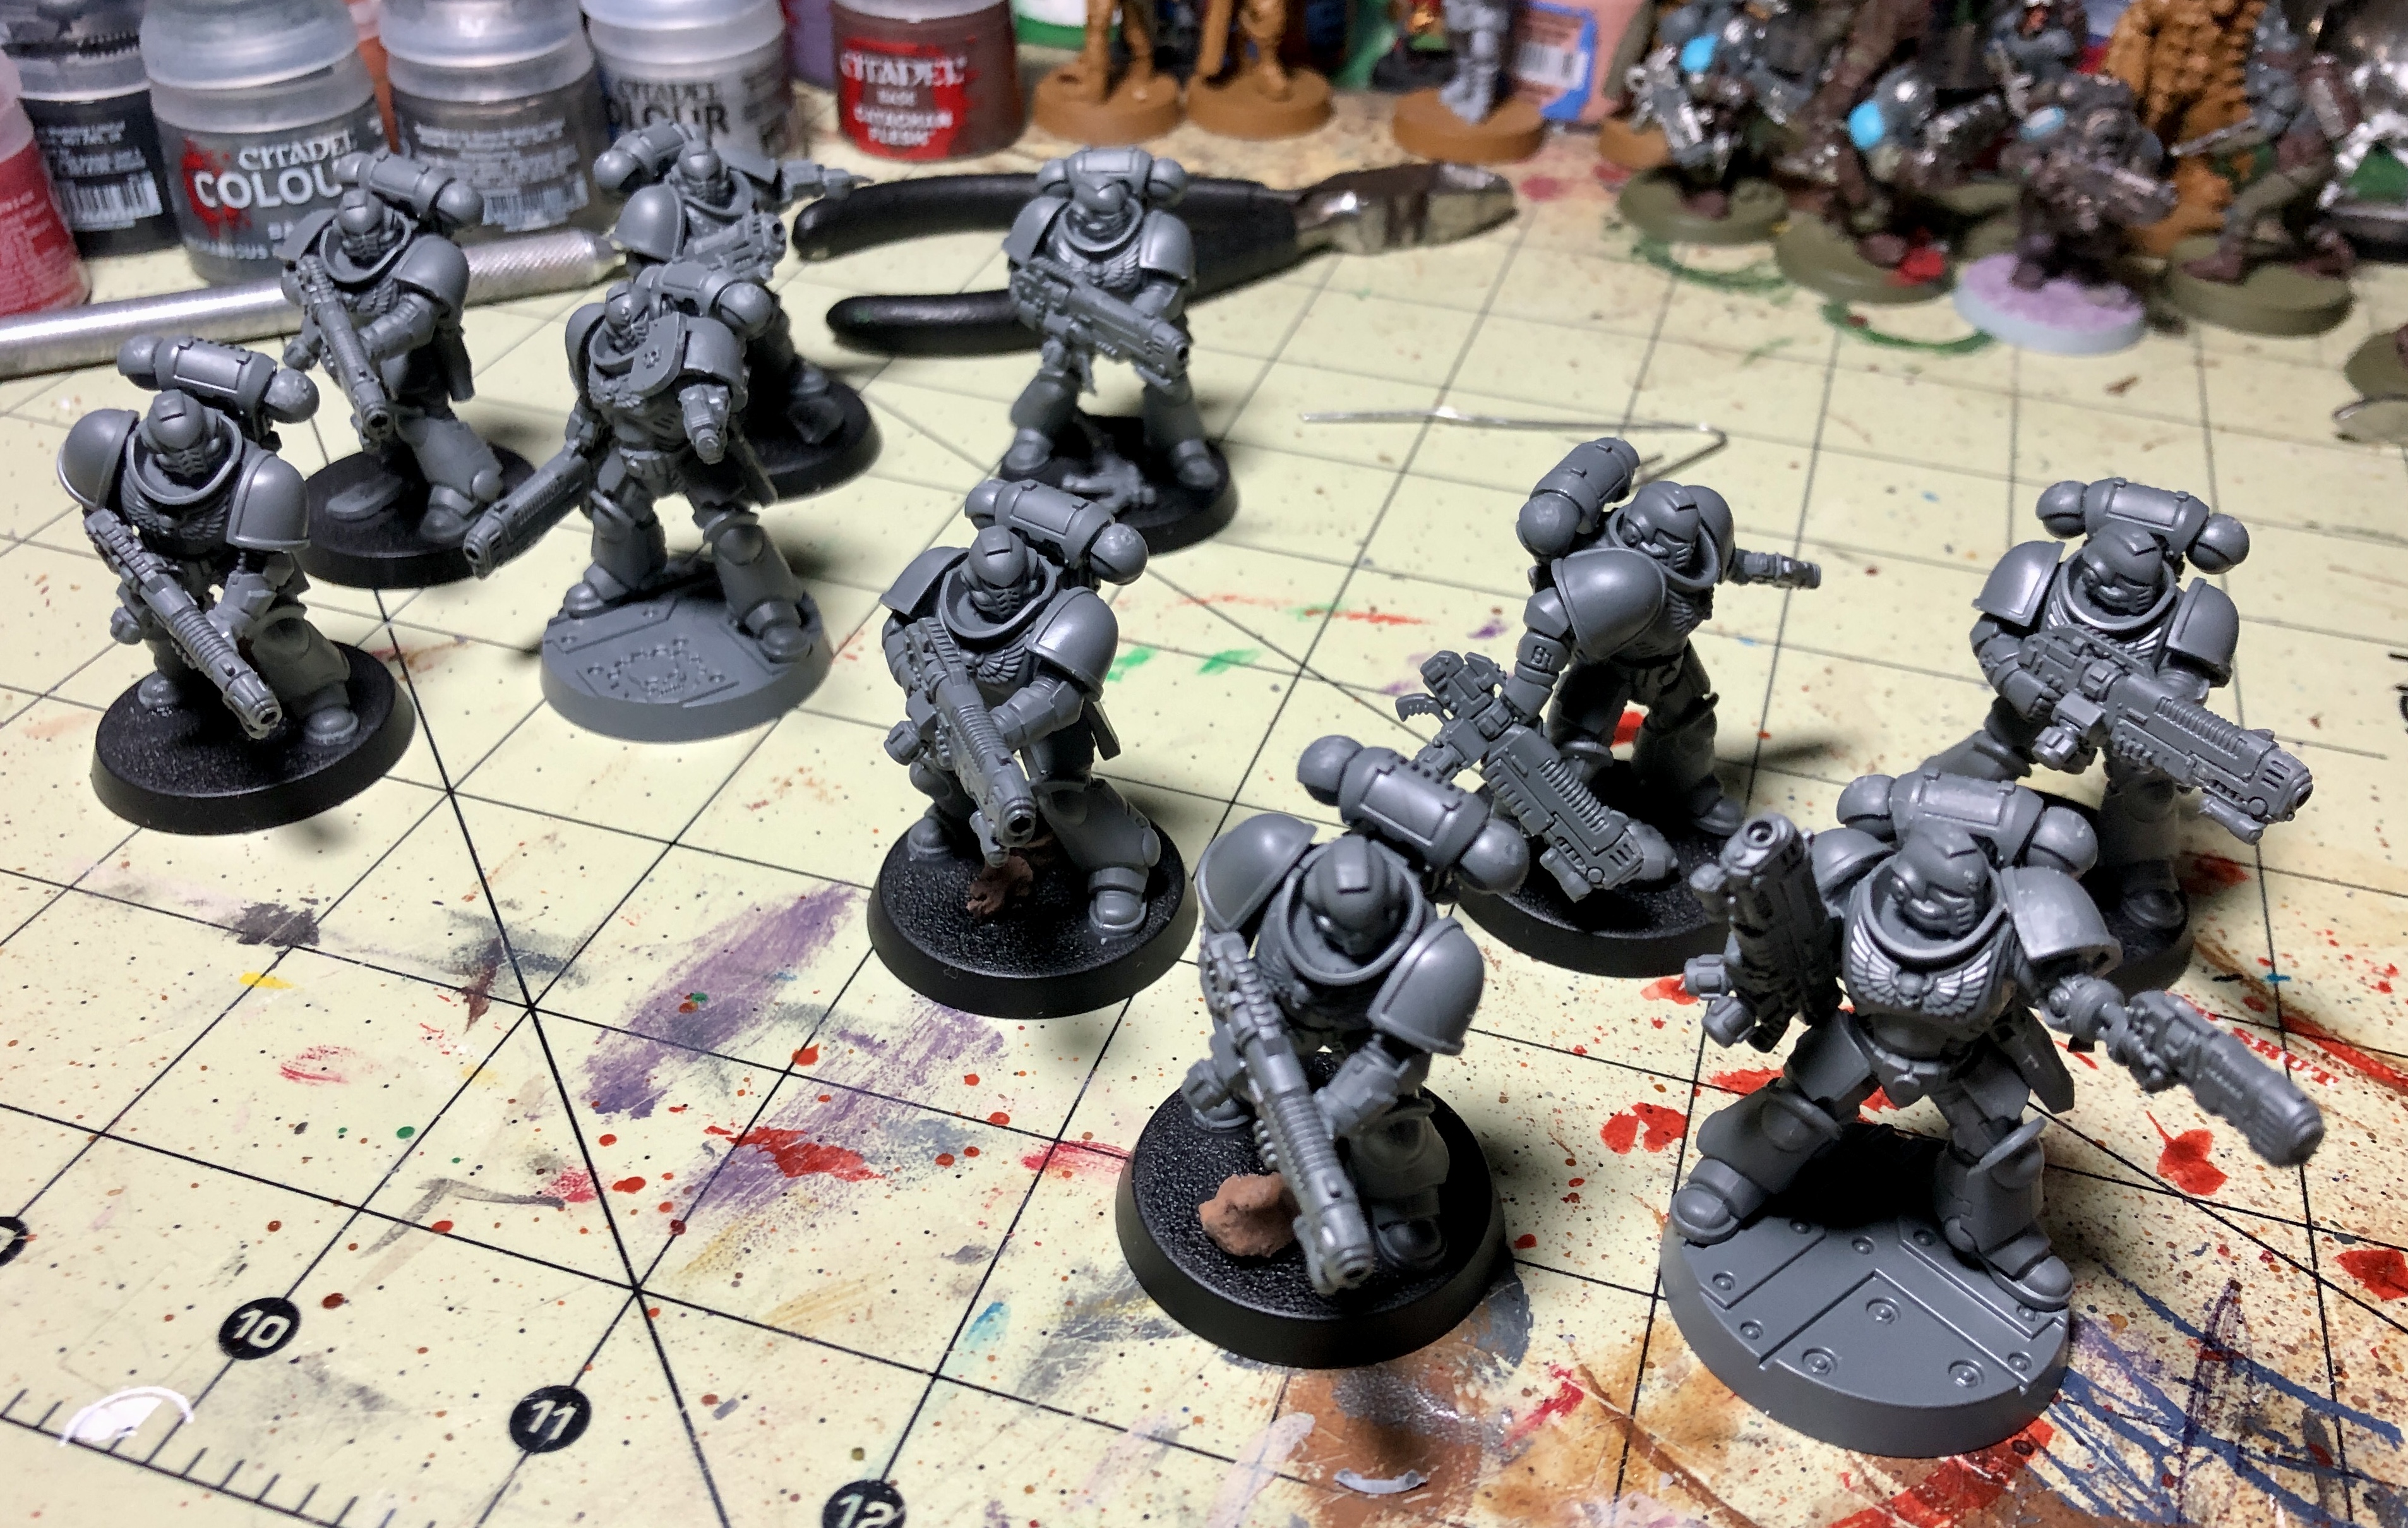
Unlike that first foray which resulted in just one painted mini and several subsequent blog mentions, I now stand at a five-strong squad of reivers and had just enough black primer for a lieutenant before running out. With Battlescribe up and running again for 10th ed, after making a 1k list for the Smurfs I then syphoned off the rest of my marines for the Dragons.

The primer didn't go on too smoothly, likely due to the ridiculously hot & humid weather. This is most evident on their combat blades.

Currently the Dragons clock in at somewhere between 600-700 points depending on whether on not they inherit my Chaplain or not. Meaning you ought not expect to see them on the table top anytime soon.

Especially as we just returned from a vacation to Boston Massachusetts which left my bank accounts almost empty (frighteningly so), while additionally adding far too much to my credit card bill for my liking. It was well worth it though! Thus no purchases for this new army will be made for a good while.

*****

One last thing of note, and on a different subject:

Red & white stripes removed.

After being used as often as not as a captain rather than a lieutenant, Lt. Siph Horridus has been officially promoted to captain of my Ultramarines 3rd Battle company army. He received his helmet repaint just yesterday. Huzzah! 

Friday, April 14, 2023

How long does it take to build a squad of Hellblasters?

 o/

Most folks would agree that it takes just a few hours, and they would be right. In my case, it also took just a few hours though said hours were delayed by 15 or so months between the time of purchase and the removal of the box's shrink wrap. 

Here of late my poor marines have been finding themselves increasingly outgunned on the table top, with only my Hellblaster squad seemingly able to hold the line effectively. That said, I only had 6 of them making the squad both over-taxed and easily eliminated. However now that I have 16 ready for battle, I'm hoping that they'll even things out a bit for me. Only time will tell though...

These two combat squads will each gain 3 more marines
out of my pre-existing squad.

The Smurfs are now my only marine army with the Incandescent Coyotes (all 23 of them) currently redeploying to the Illy-Noise subsector. Their fully painted 'Woolly Bear' Razorback has taken up residence in my display cabinet, whereas the Coyotes' half-painted rhino was reprimed in anticipation of being (eventually) repainted in Ultramarine colors. 

Not many of the unpainted Coyotes were retained due to all of the Space Wolf Coyote accoutrements. Like the also defunct Silver Drakes, the remnants of the Coyotes were folded into the Smurfs making it a rather large army at this point. 

Full circles are painted models, empty are unpainted, and half circled are works in progress.


Friday, January 6, 2023

Fun with stencils (Take 2)

o/

Can't see it can you?

Way, way back in 2016 I bought some stencils from Fallout Hobbies and gave 'em a try. It was kindova disaster. Clearly the stencils were intended to be used with an airbrush rather than a paint brush. Skipping forward to the present and I still don't have an air brush (nor am I looking to get one), so upon finding the same stencils tucked away in a box here recently, I thought I'd give em a go when priming and...they look alright me thinks. 

This model arrived in the mail already primed black.

I didn't think to take any pics until after the 3rd coat of primer.

This vehicle is a WWII German prototype APC (probably the first modern APC) of which only two are thought to have been built. I stumbled across this model when looking for a cheap, model for a sci-fi APC for my near future troopers, without a 40K and/or Star Wars design aesthetic. Turns out, that there's not a whole lot out there that fits that bill. This caught my eye though and being obscure as it is, I figured what the hell. For something that's likely to only ever sit on a shelf, it's fine. Here it is thus far:

I wonder how visible the camo will be once this is coated in my usually thick layer(s) of grime.

The O.D. green went on a bit heavy and left a slight ridge around where the stencils were. Am sure said ridges disappear during the drybrushing phase.  

I'd imagine that if 40k Guardsmen were to try climbing into these tight confines, they would feel like space marines trying to squeeze into a Rhino!

Looks good overall, now I just need to paint the rest of it. 


Friday, February 12, 2021

This week in camouflage...

Space marines in, in... camouflage?!?!

Wut da fuk...?

HERESY!!
 **BLAM!!!**

Once again I contradict myself. What is it I almost continuously rail about in regards to 40k currently? Primaris Marines. And what is it that I painted this week? A Primaris marine. Facepalm.


Yes, this pic is relevant...


Actually I've been wanting to paint one of these guys up in camouflage for quite awhile for whatever reason. So after finishing up the my two Humvees for Team Yankee earlier this week (which came out really, really well), I figured: eh, what the hell...and so here we are. 

You'll note that not only is this marine painted in the classic, Desert Storm era chocolate chip pattern camo, but he's also bereft of iconography aside from a contrasting OD green Aquila on his chest plate (which likely does NOT mean he's from somebody's 4th battle company...). Camo...no identification...it can mean only one thing. 

Yep, it's the Alpha Legion. Betcha didn't see that coming did you? Hehehe, a little bit of camo-humor there...and uh, moving on...


Curiously, whereas the caked on desert dust wash works quite well on my Incandescent Coyotes, I don't really like it on this desert camo marine. Naturally that makes no sense whatsoever.

This was more or less and exercise with two goals. (1) do I like the look of this? Answer: Yes, just sans the aforementioned dust wash. (2) Is this so laborious to do so as to make painting more than a handful unfeasible? Answer: no...not really. Honestly it was far easier and quicker than I had expected. It would have been even quicker were the mini not primed green to begin with. As for painting more than a few well...it's me. So that answers that.

I pondered iconography for quite a bit, and ultimately skipped it as this was just a test marine anyways. For some reason I kept gravitating towards the Blood Angels, and indeed there is a long, mostly-forgotten precedent for camo'ed BA. The readily available black icons ought to look good on this camo as well, though technically the Space Wolves and Black Templars icons would fit into that category as well. 

For right now though, we'll just go with Alpha Legion. I'm thinking I'll just put this guy on one of the shelves in my cube at work and ponder the idea for awhile before proceeding any further in this direction.  

(Note: Primaris marine pics replaced after publishing due to better lighting here at work.)

Monday, June 8, 2020

The first combat squad is completed!

o/

And so a new chapter starts to coalesce...


Indeed my Incandescent Coyotes need to bolster their numbers quickly as they've already roused the ire of the Black Templars. Luckily that particular crusade is waging war in another segmentum, with the vast gulf of the Atlantic space between the two chapters.

I just clear coated and left these as is...though I'm keen to see how much of this layer of rust wash will show thru from under a layer of sand.

First up I had another go with the rust wash that I added to the track links on the meltagunner's base. I really slathered it on and whilst it's a bit more subtle in normal light, under the camera's flash it looks fantastic!

Whoa! That was one hellova sand storm! 

Above the sand wash is dry but not yet blended. Good coverage again after a minimal dry brushing of Vallejo light Ivory. I see a few spots that it looks like I missed when applying the wash (the tail was not washed intentionally), but I've found that it all ought to work out fine during the blending process.

Following this I then painted the bases and hit 'em with a quick matte coat in hopes that when I apply the agrellan earth you won't see the white and orange poking thru the cracks this time (not that the inking won't cover that up). In hindsight, there will be yet another varnish layer as I went ahead and added the sand wash too, and once blended that will come off to the touch unless it is also sealed. 

The latest completed three.

I'm pretty pleased with how these are turning out just a few models in from the initial disasters. I especially like the weathered look of their armor. 

At that point, It was just a little bit of dry brushing on the agrellan and tail, a few final touchups, a final matte varnish coat and they're done!

Can't really see the rust thru the sand, so not sure if I'll do one atop
the other again as its largely unnecessary. 

The same goes for the Iron Warriors' helm, the sand wash
obliterated the rust layer beneath.

The finished Combat Squad. 

Another, slightly different angle showing off the chapter icon and
the sergeant's coyote tail.

My next post will feature the myriad distractions that were 'also in-progress' whilst I was working on these three. Because ya know...short attention span and all that.

Monday, May 18, 2020

Gettin Dirty Part 2 (The Hounds of Demos)

o/


I can't honestly say I have the new weathering washes, contrast paint, or even Agrellan Earth all figured out. However I've managed to get two Hounds of Demos marines to look both fairly similar and for the most part in the way I had originally envisioned (albeit via different routes). Now the trick is to maintain a consistent look without taking for bloody ever as these first two did...


Picking up from my last post, this is where i had left off from, with one marine washed and the other not.


I gave the marine on the left a very light dry brushing of bleached bone (or rather Vallejo's equivalent) prior to adding the wash. That apparently gave the surface enough grip for the wash to coat pretty evenly and as such I'll be using this method from here on out. 

The marine on the right was the previously washed, blended and sealed marine as seen in my prior post. So I just slathered on another coat and hoped for the best which as it turns out more or less ended up matching the other one.


After brushing/blending the excess dried wash off, I hit em with a quick layer of varnish before painted the bases. I then applied Agrellan Earth. I guess maybe I ought to have sealed the bases as well? Despite the solid coating, the Agrellan peeled up the base coat with itself revealing the white primer and excess orange contrast beneath. 


Then of course there's the issue of the Agrellan not even closely resembling the shade of the sand wash. So I gave the bases a quick, light inking which filled in the cracks covering the orange and white nicely. I then applied a light dry brush of bleached bone, but the tone still wasn't right, so I then added another layer of German yellow ochre and that matched the sand wash well enough to call the models 'done' pending a final coat of varnish. 


The Hounds' chapter icon. I had originally wanted to put the company number above it, but the decal application over that much of the pauldron's curve caused me to change my mind...


Like a vehicle heading down a dusty trail, the most grime collects on the rear. I guess there was some heavy/extended sprinting drills or something.


The finished doubly washed  battle brother.


A note on the other chapter markings: The white tactical arrow has been retained following the black arrow debacle. The right knee shows the company color, with the squad number below it on the greave armor. 

Oh, and I've since fixed that little white dot of missing paint on the right side marine's base.

Here are my first two Hounds of Demos. First squad, 5th battle company of the Hounds of Demos as photographed on the northern steppes of Backyardistan, Appalachian Subsector. 

I haven't formalized and fluff or backstory to go with this budding force yet, though I do have a few ideas percolating in the back of my mind...  


Friday, May 15, 2020

Gettin' dirty...

o/


As you all know, I don't like paint 'clean' minis but rather 'dirty' ones, hell even my Eldar are kinda dirty (and not just in their ways of war...). Normally this is achieved with dry brushing on the grime after the slathering of ink has dried. However dry brushing adds crud to the raised surfaces, whereas most grime (in real life) collects in the recesses and to be honest this has always bothered me a bit. 

The ultimate weathering washes are used by painting extraordinaire (in my opinion) Dwartist. Always a fan of the realism of his weathering I looked up some tutorials, liked what I saw, and how easy they were to use and bought some to give them a go myself. 

Bad print lines ought to be perfect for this project!

I painted up my Tilly to use for a test model as in hindsight, the print lines really made it look pretty rough (the truck on the other hand is much smoother), not to mention the notion of my pot-bellied Quar squeezing into the cab is kinda laughable. 

Chaos ensues...

Anyways, I varnished the Tilly and a few other minis in gloss coat as recommended in the tutorial linked above and once dry started slathering the wash on only to be met with almost immediate disaster!

Yeah this doesn't look anything like what I saw in the tutorial.
Fucking gloss coat, there's a waste of $8...

DO NOT, I repeat DO NOT USE GLOSS VARNISH as the wash will just bead up and run off like rain on a newly waxed car! I finally got it coated (sorta) as well as my shorts, desk, keyboard and anything else nearby due to to the run off. Seriously WTF?!? 

I then re-clearcoated the other minis in matte varnish and applied it to one of my Hounds of Demos marines. Whilst it went on much better, the painted on full coverage of the tutorial still alludes me. 

I also tried applying it to an unvarnished marine which just resulted in that poor sap being consigned to the simple green. Removing the excess after the wash is dry seems (to me) best done with an old, fairly stiff paint brush. Needless to say, in the case of that unvarnished marine, I just took it's paint off as well. 

Not great, but not too bad either...it does look
like it's been down a dusty road or two.


I kinda like it, but there's obviously more of a learning curve than the youtube video implies. Score another point for marketing...

So, after a bit of nerd rage and a WTF?!? facebook IM to the company (who read it but chose not to respond) I calmed down and determined that my initial test models didn't look half bad after working them over with a brush to remove the excess/blend in the dust. By the way, I suggest wearing a mask for this latter part. Luckily, everybody has those lying around at the moment, right?

A good side-by-side comparison of an unwashed and washed marine. Any speed gained from using the contrast paint will I think be negated by adding this extra step into the weathering process.

On a different note, I tried to apply black tactical arrows that I have had  since I tossed one set in the trash as all they did was disintegrate whereas the home made decals just looked brown in comparison to the GW decals, and were also shelved (but not tossed as the red decals I used on the astral claws are also on that sheet). This was more or less a 2-day disaster/reversal of progress which is why the pauldron with the (once again) white tactical arrow is so much darker than before.

I had hoped I could use this stuff in lieu of dry brushing but as I'm still in the testing phase, I think I'll try dry brushing that marine on the left before applying the wash to see what sort of effect I get from the two methods combined. Needless to say this stuff is all a very much 'work in process'. I have a few more marines base coated, and thus I think that the Hounds will now be the principle victims of this learning process.