o/
As you all know, I don't like paint 'clean' minis but rather 'dirty' ones, hell even my Eldar are kinda dirty (and not just in their ways of war...). Normally this is achieved with dry brushing on the grime after the slathering of ink has dried. However dry brushing adds crud to the raised surfaces, whereas most grime (in real life) collects in the recesses and to be honest this has always bothered me a bit.
The ultimate weathering washes are used by painting extraordinaire (in my opinion) Dwartist. Always a fan of the realism of his weathering I looked up some tutorials, liked what I saw, and how easy they were to use and bought some to give them a go myself.
 |
| Bad print lines ought to be perfect for this project! |
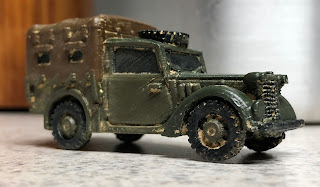
I painted up my Tilly to use for a test model as in hindsight, the print lines really made it look pretty rough (the truck on the other hand is much smoother), not to mention the notion of my pot-bellied Quar squeezing into the cab is kinda laughable.
 |
| Chaos ensues... |
Anyways, I varnished the Tilly and a few other minis in gloss coat as recommended in the tutorial linked above and once dry started slathering the wash on only to be met with almost immediate disaster!
 |
| Yeah this doesn't look anything like what I saw in the tutorial. Fucking gloss coat, there's a waste of $8... |
DO NOT, I repeat DO NOT USE GLOSS VARNISH as the wash will just bead up and run off like rain on a newly waxed car! I finally got it coated (sorta) as well as my shorts, desk, keyboard and anything else nearby due to to the run off. Seriously WTF?!?
I then re-clearcoated the other minis in matte varnish and applied it to one of my Hounds of Demos marines. Whilst it went on much better, the painted on full coverage of the tutorial still alludes me.
I also tried applying it to an unvarnished marine which just resulted in that poor sap being consigned to the simple green. Removing the excess after the wash is dry seems (to me) best done with an old, fairly stiff paint brush. Needless to say, in the case of that unvarnished marine, I just took it's paint off as well.
 |
| Not great, but not too bad either...it does look like it's been down a dusty road or two. |
 |
| I kinda like it, but there's obviously more of a learning curve than the youtube video implies. Score another point for marketing... |
So, after a bit of nerd rage and a WTF?!? facebook IM to the company (who read it but chose not to respond) I calmed down and determined that my initial test models didn't look half bad after working them over with a brush to remove the excess/blend in the dust. By the way, I suggest wearing a mask for this latter part. Luckily, everybody has those lying around at the moment, right?
I had hoped I could use this stuff in lieu of dry brushing but as I'm still in the testing phase, I think I'll try dry brushing that marine on the left before applying the wash to see what sort of effect I get from the two methods combined. Needless to say this stuff is all a very much 'work in process'. I have a few more marines base coated, and thus I think that the Hounds will now be the principle victims of this learning process.


No comments:
Post a Comment